Your Java EE App on Kubernetes
In previous post we managed to run Payara on Kubernetes. This is of course bit dull without applications deployed. Next we will create an actual aplication, that will deploy with official Payara container. We will use the full profile Payara, just to demonstrate, that microservices can be built using standard distribution.
Let’s see what we will need to have our app in Kubernetes as well:
-
.war Maven project
-
Fabric8 Maven plugin
-
Docker for Windows / Docker tools
Installing Docker tooling
Given my hobby environment (Windows 10 Home), I cannot use the current Docker for Windows installation — remember, there’s no HyperV in Home edition. We need to install Docker Toolbox, its retired ancestor.
Sidecar approach
I assume you don’t upgrade your application server as often as you upgrade your applications. But when you do upgrade your server, you shouldn’t need to rebuild all of your applications. At least I wouldn’t like to do that.
Kubernetes gives you solution to that, called Sidecar containers. Instead of running single image, you put multiple images together, and they can speak to each other via localhost, or share directories.
So we will take Official Payara Docker Image, mount its autodeploy directory, and for our app we will build an image based on busybox, that will just copy our .war file to that folder.
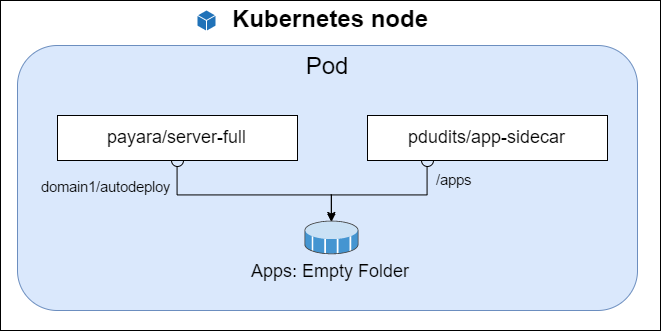
The app-sidecar will be based on busybox, adding just 1MB of binaries to our app package.
Creating Docker images with Maven
One doesn’t need to leave its trusted tools for this fancy new tech! Everything you need to do concerning Docker images and Kubernetes you can achieve with Fabric8 Maven Plugin. Fabric8 is entire CI/CD pipeline for Kubernetes, and I will surely look into it in next posts — first, I need to understand what am I doing before I let magical tools do that for me ;).
The goal build of Fabric8 plugin constructs the Docker image based on image configuration.
So this is what the interesting parts of pom.xml look like:
<plugin>
    <groupId>io.fabric8</groupId>
    <artifactId>fabric8-maven-plugin</artifactId>
    <version>3.4.1</version>
    <configuration>
        <images>
            <image>
                <name>pdudits/%a:%l</name> (1)
                <alias>app-sidecar</alias> (2)
                <build>
                    <from>busybox:1</from> (3)
                    <assembly>             (4)
                        <descriptorRef>artifact</descriptorRef>
                    </assembly>
                </build>
            </image>
        </images>
    </configuration>
    <executions>
        <execution>
            <id>fabric8-default</id>
            <goals>
                <goal>resource</goal>
                <goal>build</goal>
            </goals>
        </execution>
    </executions>
</plugin>
| 1 | The name of docker image. %a stands for artifactId, %l stands for release verson or latest for snapshot |
| 2 | we can use this alias for defining kuberenetes resources later |
| 3 | Our base image |
| 4 | The Maven Assembly Descriptor Name, describing what should be copied into the image (inside directory /maven by default). |
To actually run the build you need to have Docker environment configured, as the plugin will call out to Docker.
Minikube has this nice feature, that it will reuse Docker daemon from within minikube VM.
You therefore doesn’t need to run another VM, just make sure to follow instructions of minikube docker-env before invoking maven:
d:\src\k8se9s\payara-sidecar>minikube docker-env
SET DOCKER_TLS_VERIFY=1
SET DOCKER_HOST=tcp://192.168.99.100:2376
SET DOCKER_CERT_PATH=d:\src\kubernetes\.minikube\certs
SET DOCKER_API_VERSION=1.23
REM Run this command to configure your shell:
REM @FOR /f "tokens=*" %i IN ('minikube docker-env') DO @%i

d:\src\k8se9s\payara-sidecar>@FOR /f "tokens=*" %i IN ('minikube docker-env') DO @%i
That also means, that whatever you build is immediately available for deployment into your Kubernetes cluster.
Kubernetes Resource Descriptors with Maven
fabric8:resource will take YAML files that serve as templates for resource descriptors, add some useful labels to them, and attaches them as build results.
For our sidecar we will create a Deployment. It is a declaration of what Pod should look like with added features like replication — more than one instances of same pod — and rolling upgrade. Especially the rolling upgrade is interesting for us. When you upgrade your app, a new Pod will be created, and when it starts successfully, the trafic will be directed to it, and after that the old pod is stopped.
So let’s see the file:
spec:
  replicas: 1
  template:
    metadata:
      labels:
        run: payara
    spec:
      volumes:
      - name: apps                    (1)
        emptyDir: {}
      containers:
      - alias: app-sidecar            (2)
        volumeMounts:
        - name: apps                  (3)
          mountPath: /apps
        command: ["sh","-c", "cp -a /maven/*.war /apps; tail -f /dev/null"] (4)
      - image: payara/server-full:171 (5)
        name: payara
        command: ["bin/asadmin", "start-domain", "-v"]
        ports:                        (6)
        - containerPort: 8080
          name: http
        - containerPort: 4848
          name: admin
        volumeMounts:
        - name: apps                  (7)
mountPath: /opt/payara41/glassfish/domains/domain1/autodeploy| 1 | That’s the directory shared between Docker images |
| 2 | We refer to the image via alias from pom.xml |
| 3 | The shared volume is accessible via /apps for container app-sidecar |
| 4 | We copy the files. Every container need to have running process, otherwise it is marked as crashed. Therefore we just hang, waiting for input from the void. |
| 5 | Payara is the other container in the pod |
| 6 | Yes that’s the old version, you’ll soon find out why… |
| 7 | And the files we copied into /apps Payara sees in its autodeploy directory. |
Another resource desciptor we’ll add will describe a service. This will give a set of pods that offer same service a common, load balanced IP address inside the cluster, and may expose it to outside world.
In our minikube, it will expose the port of the VM. In the cloud it will integrate with provider’s load balancers.
spec:
  ports:
  - port: 8080
    protocol: TCP
    targetPort: 8080
  selector:
    run: payara
  type: NodePort
The service exposes port 8080 (the http port) as port 8080 of the service API.
The calls will be directed to pods, that have label run equal to payara.
And to expose it to outside world, we will use a port of the node Kubernetes runs on — the minikube VM in our case.
Deploying to the cluster
Now that we have run our mvn clean install, we’ll have our docker image pushed, and our resources created.
Next we’ll deploy with mvn fabric8:deploy.
[INFO] <<< fabric8-maven-plugin:3.4.1:deploy (default-cli) < install @ payara-sidecar <<<
[INFO]
[INFO] --- fabric8-maven-plugin:3.4.1:deploy (default-cli) @ payara-sidecar ---
[INFO] F8: Using Kubernetes at https://192.168.99.100:8443/ in namespace default with manifest d:\src\k8se9s\payara-sidecar\target\classes\META-INF\fabric8\kubernetes.yml
[INFO] Using namespace: default
[INFO] Updating a Service from kubernetes.yml
[INFO] Updated Service: \payara-sidecar\target\fabric8\applyJson\default\service-payara-sidecar.json
[INFO] Updating Deployment from kubernetes.yml
[INFO] Updated Deployment: \payara-sidecar\target\fabric8\applyJson\default\deployment-payara.json
[INFO] F8: HINT: Use the command `kubectl get pods -w` to watch your pods start up
Here we are!
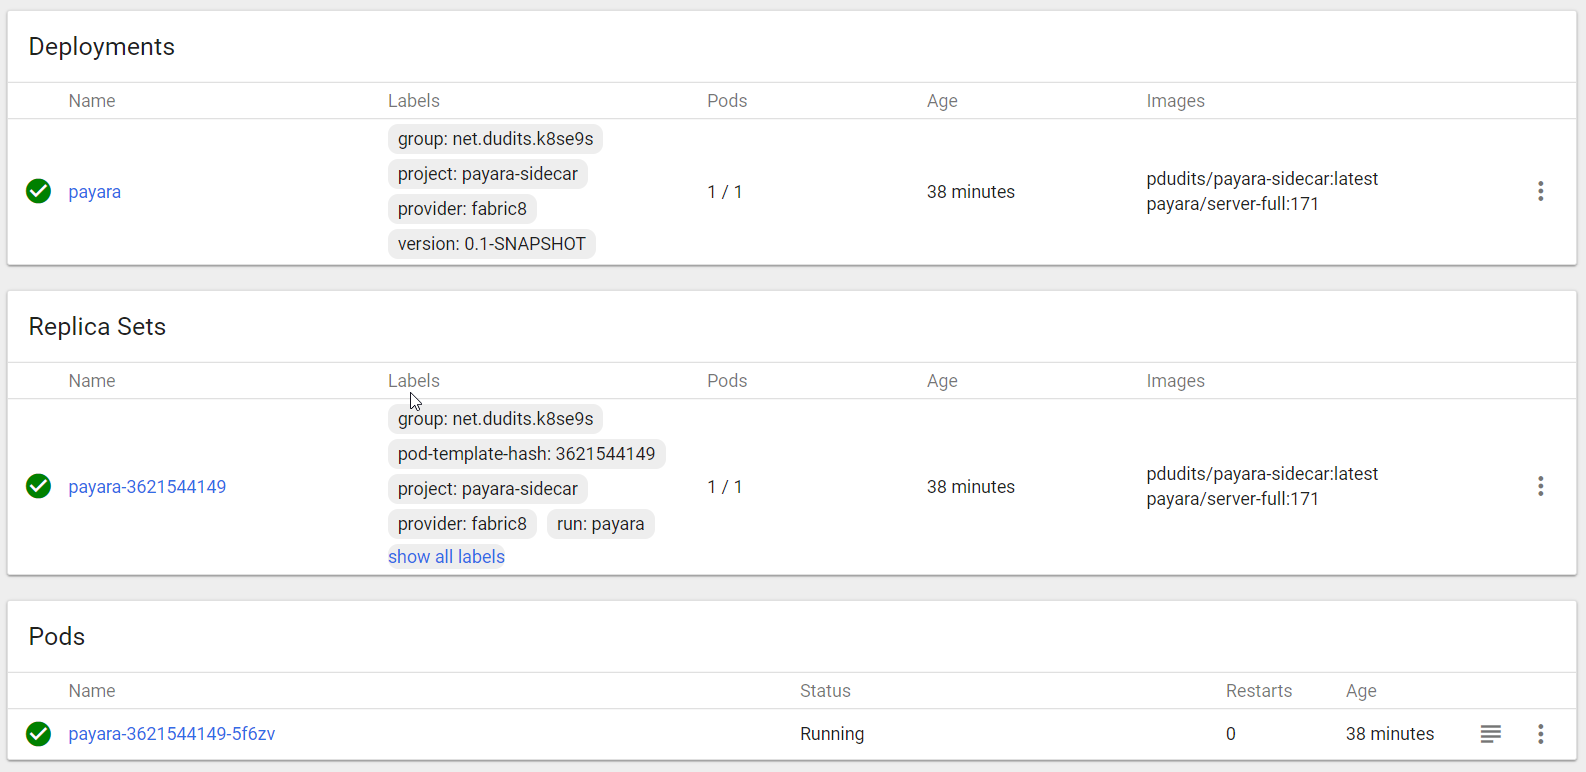
Our .war that were deploying to Payara now deploys to docker container with payara server inside Kubernetes!
minikube service payara-sidecar
Will open browser with the app. You need to add /payara-sidecar to the path.
P. S.
Look what this does:
>kubectl set image deployment/payara payara=payara/server-full:172
deployment "payara" image updated
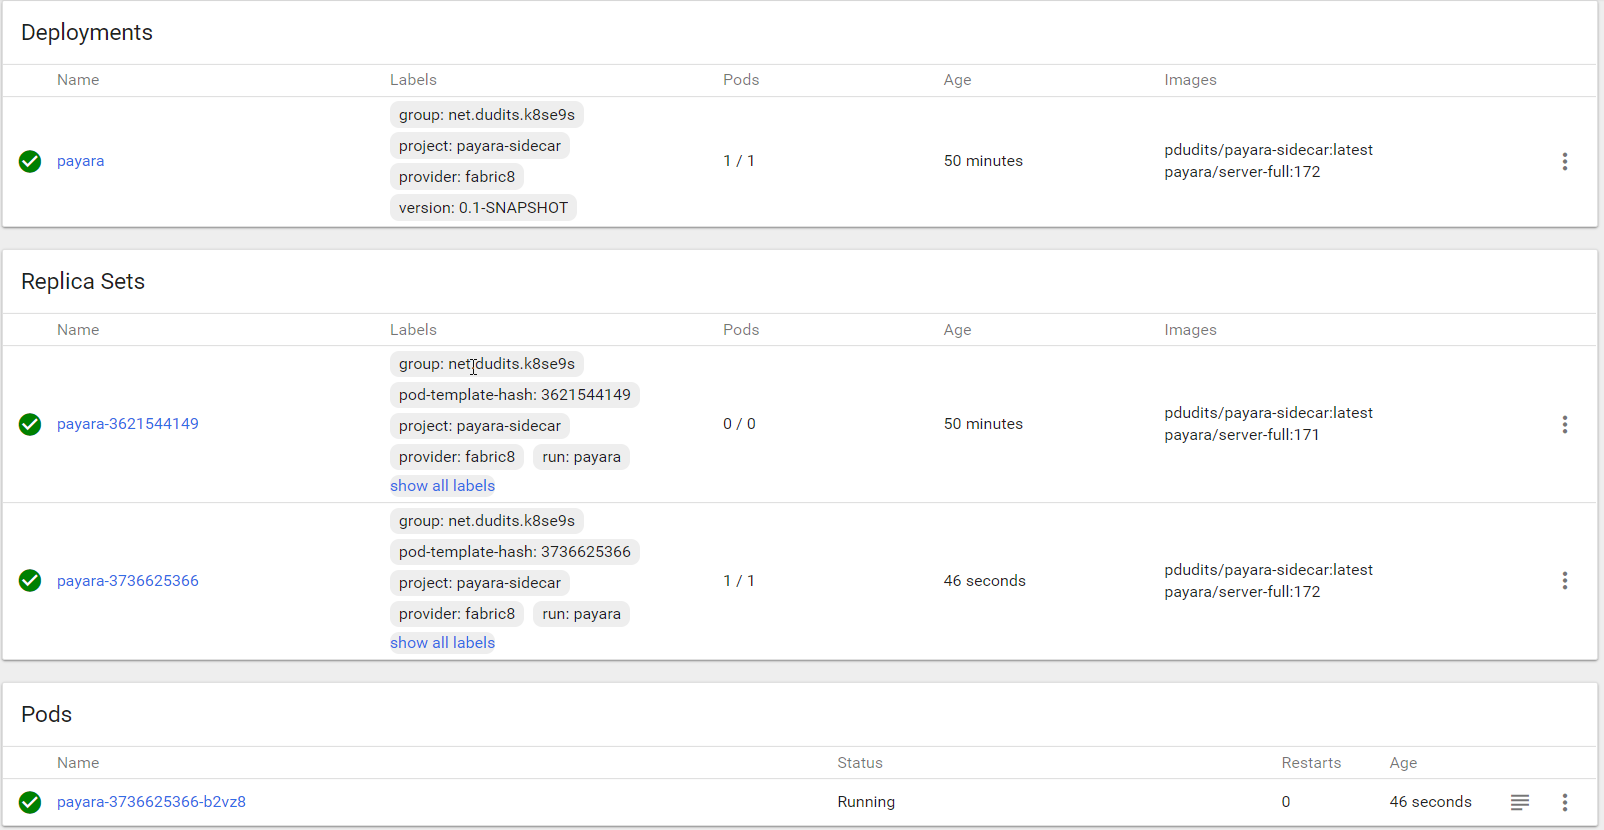
New pod was started with newer version of application server, and after it started, the old one was removed.